|
|
 |
|
Geometry, Anyone?
|
|
|
I confess, track planning is a part of the project that I've been dreading from day one. I don't get much pleasure out of
calculating angles of curvature and inclination, so I was looking for some help with my plan.
To begin with, I spent several hours browsing track plan books in the local train shop. Of course, they had nothing in
Z scale, so I tried imagining the HO and N guage plans scaled down to the dimensions I wanted. Despite a wealth of choices,
I didn't find anything that really grabbed me.
Next, I turned to the internet. This time, I did manage to hunt down a few Z scale plans (some even had Marklin parts
lists attached). But again, I didn't find what I wanted. It was starting to look as though I'd have to come up with my own
design.
If I was going to design my own plan, I'd need some help. One option was a Marklin Track Plan Stencil (Marklin #0212).
Armed with this and a pencil, I went to work. I'm sure this method has proven successful for many a modeller, but I was less
than impressed with my own meagre results. The stencil went into storage (for the time being, at least).
Then there was the high-tech solution. There are all kinds of track planning software out there, ranging from cheap 'shareware'
programs that you can get for $30 or so, all the way up to professional quality design tools costing hundreds. Wanting to
save my hard-earned cash for buying things like track, rolling stock and buildings, I opted to try a demo version of one of
the shareware programs. After several frustrating attempts, I pulled the plug on that particular program. I now understand
that there are good reasons why some programs are shareware. I'm sure there is better software out there. Perhaps someone
with more patience than I can track them down and recommend them.
Just when hope was dwindling, I ran across the Marklin Track Planning Game (Marklin #0232): a collection of half-sized
plastic sections of all the track that Marklin produces. Having spent many happy hours building with Lego during my formative
years, this suited me perfectly. While it really isn't a 'game' as such, I finally began to enjoy the process of designing
my track plan as I connected tiny track sections into a variety of configurations.
|
|
|
|
|
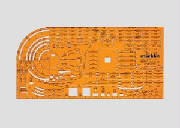
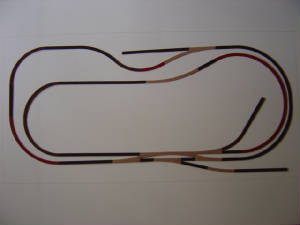
| Click for a larger version of Track Plan 1. |
|
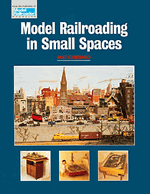
During the course of my browsing for track plans, I did run across one particular
book that I found quite inspiring - "Model Railroading in Small Spaces" by Mat Chibarro (Kalmbach Publishing). It's packed
with tons of good ideas for making the most of minimal layout space. Among its plans was one that might be adapted to fit
with my theme.
I broke out my Marklin track 'game' and went to work on this folded loop track with a siding and several
spurs. At first glance, the plan looked good. I could almost visualize the mountains, waterfall, and the village clustered
on the riverbank. There was just one concern - the incline. In order for the track to loop over itself within the 2' by 4'
layout, it had to rise at a grade of almost 4%. This may be fine in HO and N, but I soon discovered from the experts at the
Z Scale Forum, that it could be problematic for my tiny Marklin steam locos. The almost unanimous opinion seemed to be that
2% was about the maximum grade for Z scale, unless you're feeling extremely reckless.This being my first foray in Z scale
modelling, their advice caused me to re-think my plan. So, it was back to the drawing board.
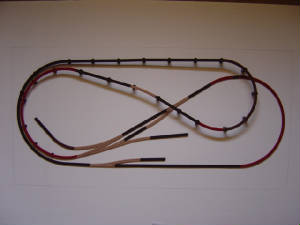
| Click for a larger version of Track Plan 2. |
|
Having established that I do want to combine some continuous running with
shunting operations, I came up with this second plan. Having a connected double loop allows enough variety to give the illusion
of a longer run. I still managed to keep the spurs for a couple of small industries. And with some slightly exaggerated landscape
contours, I thought I could create a sense of a mountainous region, while keeping the tracks perfectly horizontal.
This
plan also allowed me a fair amount of space to indulge in a reasonably ambitious town scene. The town of Meiringen would sit
in the center, while the railroad meanders through the mountains on the northwest (see the photos link for Track Plan 2).
The Reichenbach Falls would be located at the northern tip of the mountains, crashing into a gorge that feeds a
nearby river.
Despite the fact I had talked
myself into settling for plan 2, I spent several months combing the web and talking with other Z scalers about their layouts
to try and avoid major errors in designing my own. I kept coming back to the realization that, of the two plans I have been
considering, the one that appeals to me most is plan 1 – the folded dog bone. It allows for more variation in continuous
running, since the train doesn’t appear to be simply going in circles (although, technically, it is). And the over-under
aspect adds to the interest. Besides, I had, by this time, seen several other small Z layouts that successfully used gradients
in a figure-8.
While the second plan might prove
simpler, in that there’s no need for a gradient, there’s only so much you can do to disguise the fact that it
is simply a loop.
The clincher was when I made some
tests to see whether my small European steam locos would be able to handle the required gradient and still pull a consist.
The tests were by no means scientific or complex! I just took my test track loop mounted on its board and added a little height
to one end with some magazines. I kept increasing the slope until I reached the degree that I’d need on my layout, and
then I let the trains run a while to see if they encountered any difficulty. Since they were pulling short consists typical
of a local line, they performed fine. The test was a success, and the decision was made – after almost two years and a
few minor tweaks, plan 1 got the official seal of approval!
The town of Meiringen will still sit in the middle
of the layout and the Reichenback Falls
have now been relocated to the northeast, feeding a river flowing south.
The moral of my story:
Don't rush this part of the process! Let your options sit a while.
Come back to them later and see if you're still drawn to one design or another. Weigh the pros and cons. Test the cons. Can
the problems be overcome? If so, go with the plan you really want, even though it may be more of a challange.
|
|
|
|